Hello, konnichiwa, aloha, buongiorno hobby and painting friends!
In this article, I will show how I made a quick and simple cobstone base. This could be for a scene in a house, a dungeon or just as a stone wall in a field.
I wanted to make a base for a 3D printed barbarian mini I once got. (I'm sorry I forgot where I got it) And I figured him raiding a house or exploring a dungeon. (the mini has a very high Elder Scrolls feel for me) So I had to make him a base that sets the scene for that! I was looking at some pictures and decided on what I thought looked best.
I started with a piece of roughly sawed / half splintered wood. This was done intentionally but didn't turn out the way I wanted. However, it was perfect to serve as a base for this!
I started by drawing out how I wanted my base to look, (yes I was actually planning ahead) by tracing the outline of the base on some paper. This gave me a base where I could make sketches on and help me sculpt (or in other cases maybe build) the base on.
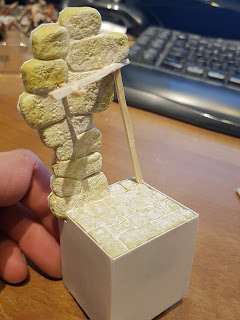
I started by sculpting the wall out of Milliput balls, tacked together, made to look like stones and I textured them using a rigid brush, an old toothbrush, and a sponge. You can pretty much use whatever you like and what you have lying around.
Once I was happy with the result, I let the Milliput dry a little so it won't be too vulnerable when I started sculpting. It doesn't have to set rock hard, just firm enough so it won't scratch or dent easily. I then continued with the floor tiles. To make the Milliput adhere to the wood better, I scored the base with Dremel. This way the Milliput has something to grip onto so it won't let go once the Milliput dries. Using the same tools I used making the wall, I sculpted and textured the floor tiles.
Once the floor is done, it was time to create some morter between the rocks. This was done by rubbing in some watered down gypsum over the stones and tiles. I also used this to dull down some of the texture on the rocks.
I have also added some balsa wood square sticks to the base to look like struts and placed them in "logical" places, or where I thought it would look good. You can also use this to add some more dimensions to your base, as you can use it to create depth or the illusion of a larger structure. By this time, the gypsum has dried and set between the stones to look like cement.
To make the base more interesting I also added a vase. I created this by hot-gluing a gypsum brick to my rotary tool and spinning it while using sandpaper and files to manipulate the gypsum. (mini for scale)
Finally, I added some plasticard to the sides of the base and to the back, to give the whole thing a smooth finish. I cut all the pieces to size and glued them to the wood. I then proceeded to cut and sand the plasticard to fit the profile of the wall.
That's it for this step-by-step! I hope you guys enjoyed it and find it useful to see what I did to create this.
How do you make your bases? Do you go all out with putty, or do you just want to create a simple setting on a plinth or gaming base? Let me know in the comments!


No comments:
Post a Comment