Hello my friends!
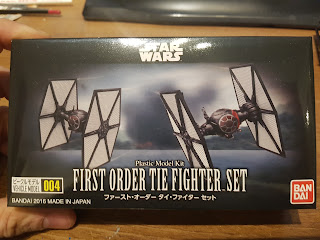
If you follow me personally on facebook you might know that I received two extra Bandai Kits. Today I will unbox and review the First Order TIE-Fighter set and I will do the Millenium Falcon (hopefully) next week.
If you follow me personally on facebook you might know that I received two extra Bandai Kits. Today I will unbox and review the First Order TIE-Fighter set and I will do the Millenium Falcon (hopefully) next week.
A couple of weeks ago I took a look at the Imperial Star Destroyer in this range of models. The diorama I'm working on is almost complete!
Back to the TIE's!
This kit features both the TIE/fo and the TIE/sf space superiority fighters. The First Order TIE's have a similar design to the old Galactic Empire TIE/ln fighters but are basically upgraded versions. The TIE/fo has deflector shields and improved solar cells while the TIE/sf is outfitted with a hyperdrive and has place for a pilot and a gunner to operate the ventral turret. The TIE/sf is reserved for the First Order's most elite pilots.
Enough with the background information. It's a Bandai kit so officially it's only sold in Japan. Thanks to Ebay I was able to buy this kit for $4.60 which for what you get is a steal! It's Bandai so details are great and the kit is easy to put together. This is kit number 004.
The box states this kit is suited for kids from 3y/o and up but I'm a bit skeptical about that. I don't have kids but I think it's more for like 8y/o and up due to the small pieces and the skill required to cut it from the sprue and put the model together.
That doesn't take away from the fact that this is a very accessible kit in both price and required skill for younger people whether they are interested in model building or if they just want some cool Star Wars toys.
Now let's open up this box!
Just like the Star Destroyer, the instructions on how to put the models together are printed on the inside of the box. Most probably to reduce costs. It has a nice, old-school vibe to it. Unlike most Bandai kits, some of the instructions are written in English, although the instructions are simple enough to just figure it out.
This kit comes with a little sticker sheet. I'm kind of disappointed that they didn't add decals as well, as I really don't like using stickers. I won't be using these anyway as I will be painting the model but I do want to share my opinion about it.
Comparable to the Star Destroyer kit, we find five sprues numbered A1 through A4 and BM1. A4 holds a wing, TIE/fo front half, a cockpit window and two bottom plates. fist thing I noticed is that the wings are completely black. The TIE/fo is supposed to have white solar cells and there are no stickers for this. Again, I'm going to paint it anyway so it's no problem for me but I was expecting more from a Bandai kit.
On sprue A3 we find another wing, the rear half of a TIE/fo cockpit, a bottom hatch and a piece of the stand.
Sprue A1 holds a TIE/sf wing, the TIE/sf front half of the cockpit, a cockpit window and a bottom hatch. It also contains the TIE/sf heavy laser turret.
Sprue A2 holds the last TIE wing, again for the TIE/sf, the back of the TIE/sf cockpit, a bottom hatch and two parts of the hull that are supposed to be colored red.
The same as with the Imperial Star Destroyer, the sprue labeled BM1 hold the parts for the stand.
The model is easy to cut out of the sprue and easy to put together. Keep in mind that the wings have little pegs where they connect to the TIE and they will only go on one specific way.
For ease of painting the solar cells, I didn't glue on the wings yet.
Just a quick and dirty paintjob. I painted the whole model in black, painted a gloss varnish over the cockpit window and painted the struts in a medium gray. If you are hand painting it, don't forget that the TIE/fo also has two small windows on the top hatch and the TIE/sf also has a back window for the rear gunner.
Below you can see the TIE/sf mostly assembled. I left the cockpit window out because I still had to paint the parts of the hull that are supposed to be red and if you put in the cockpit window before installing these hull parts, you can't put them in later!!! I make these mistakes so you don't have to.
That concludes today's article. Eventually I will turn the TIE/sf into another crash site from Star Wars: the Force Awakens. More on this later or on my personal facebook.
I hope you enjoyed reading it!
Untill next time!
Untill next time!


No comments:
Post a Comment