Showing posts with label Bandai. Show all posts

Monday, February 6, 2017

Bandai Star Wars Vehicle Model First Order TIE-Fighter set review

Hello my friends!

If you follow me personally on facebook you might know that I received two extra Bandai Kits. Today I will unbox and review the First Order TIE-Fighter set and I will do the Millenium Falcon (hopefully) next week. 

A couple of weeks ago I took a look at the Imperial Star Destroyer in this range of models. The diorama I'm working on is almost complete! 

Back to the TIE's! 

This kit features both the TIE/fo and the TIE/sf space superiority fighters. The First Order TIE's have a similar design to the old Galactic Empire TIE/ln fighters but are basically upgraded versions. The TIE/fo has deflector shields and improved solar cells while the TIE/sf is outfitted with a hyperdrive and has place for a pilot and a gunner to operate the ventral turret. The TIE/sf is reserved for the First Order's most elite pilots.


Enough with the background information. It's a Bandai kit so officially it's only sold in Japan. Thanks to Ebay I was able to buy this kit for $4.60 which for what you get is a steal! It's Bandai so details are great and the kit is easy to put together. This is kit number 004.

The box states this kit is suited for kids from 3y/o and up but I'm a bit skeptical about that. I don't have kids but I think it's more for like 8y/o and up due to the small pieces and the skill required to cut it from the sprue and put the model together. 

That doesn't take away from the fact that this is a very accessible kit in both price and required skill for younger people whether they are interested in model building or if they just want some cool Star Wars toys. 

Now let's open up this box!
Just like the Star Destroyer, the instructions on how to put the models together are printed on the inside of the box. Most probably to reduce costs. It has a nice, old-school vibe to it. Unlike most Bandai kits, some of the instructions are written in English, although the instructions are simple enough to just figure it out.


This kit comes with a little sticker sheet. I'm kind of disappointed that they didn't add decals as well, as I really don't like using stickers. I won't be using these anyway as I will be painting the model but I do want to share my opinion about it. 


Comparable to the Star Destroyer kit, we find five sprues numbered A1 through A4 and BM1. A4 holds a wing, TIE/fo front half, a cockpit window and two bottom plates. fist thing I noticed is that the wings are completely black. The TIE/fo is supposed to have white solar cells and there are no stickers for this. Again, I'm going to paint it anyway so it's no problem for me but I was expecting more from a Bandai kit. 


On sprue A3 we find another wing, the rear half of a TIE/fo cockpit, a bottom hatch and a piece of the stand. 


Sprue A1 holds a TIE/sf wing, the TIE/sf front half of the cockpit, a cockpit window and a bottom hatch. It also contains the TIE/sf heavy laser turret.


Sprue A2 holds the last TIE wing, again for the TIE/sf, the back of the TIE/sf cockpit, a bottom hatch and two parts of the hull that are supposed to be colored red.


The same as with the Imperial Star Destroyer, the sprue labeled BM1 hold the parts for the stand.


The model is easy to cut out of the sprue and easy to put together. Keep in mind that the wings have little pegs where they connect to the TIE and they will only go on one specific way.


For ease of painting the solar cells, I didn't glue on the wings yet.


Just a quick and dirty paintjob. I painted the whole model in black, painted a gloss varnish over the cockpit window and painted the struts in a medium gray. If you are hand painting it, don't forget that the TIE/fo also has two small windows on the top hatch and the TIE/sf also has a back window for the rear gunner. 

Below you can see the TIE/sf mostly assembled. I left the cockpit window out because I still had to paint the parts of the hull that are supposed to be red and if you put in the cockpit window before installing these hull parts, you can't put them in later!!! I make these mistakes so you don't have to.


That concludes today's article. Eventually I will turn the TIE/sf into another crash site from Star Wars: the Force Awakens. More on this later or on my personal facebook. 

I hope you enjoyed reading it!

Untill next time!

Monday, January 16, 2017

Bandai Star Wars Vehicle Model Star Destroyer review

Hi friendly folks!

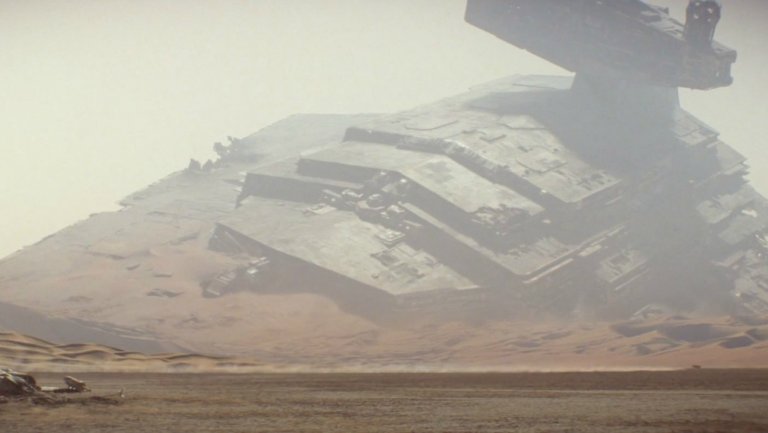
For those of you who've seen last weeks sneak-peak or if you follow me on facebook and/or Instagram might know that I'm working on a diorama of the crashed star destroyer on Jakku from 'Star Wars: The Force Awakens'.

An image released before the theater release of Star Wars 7
Now at first I was using a Revell model that was about 13cm long (the box says the scale is 1:12300) but the details are not really to my liking. I found another Star Destroyer model that is roughly the same scale that would fit my base.

I ended up with the Bandai Star Wars Vehicle model 001. Apparently, in Japan where these are sold, they are super cheap! (about $4 or so) I found some on eBay, ranging $5-10 excl. shipping and ordered one from the eBay trader hobby_japan. It arrived about a week later, well before I expected to receive it.

Now, Bandai is famous for their Gundam mech suit kits. They also released a very detailed Star Wars line, rivaling much pricier brands like Fine Molds and alike and I wrote an article about their 1:72 T-65 X-Wing fighter. Near the end of 2016 they started releasing these smaller-scaled miniatures more accessible for children, budget-wise and skill-wise. The box doesn't mention a scale but I calculated it to be around 1:14500.

Okay, enough talk, let's take a closer look!


The box is about 8x15cm, small enough to hold in your hand. But good things come in small packages so let's open it up!


Rather than adding a booklet with instructions, Bandai printed the instructions for building the Star Destroyer on the inside of the box and another thing I noticed is that instead of just having the instructions in Japanese they also added English translations.


Inside the box, we find five sprues numbered A1 through A4 and BM1. On A1 you will find the engine of the Star Destroyer along with the hangar and most of the bridge. On A2 you will find the dorsal half of the hull. On A3 you will find the superstructure, the details for inside the trench and the thrusters from the engines. Sprue A4 holds the ventral half of the hull and the sensor spheres/shield generators. BM1 is the stand.

A closer look at sprue A1
A closer look at sprue A2
A closer look at sprue A3
A closer look at sprue BM1
Building the Star Destroyer is really easy (like pretty much all Bandai kits) and requires very little to no clean up. There are no visible mold lines, it comes clean out of the sprue and only needs the occasional touch of a sanding stick to clean up where the hull was connected to the sprue.

ATTENTION!
The only place where you really need to pay attention is when you are placing the trench details. If you don't attach them correctly to the dorsal half of the hull, you won't be able to put the dorsal and ventral half together without making some small modifications. Guess how this dumbass found out...
Placing the trench details on the hull
After putting the whole thing together I compared some of the details with the Revell model I already prepared for this diorama. The main reason why I put the project on hold is because I wasn't satisfied with the details on the Revell Star Destroyer model. Putting them side by side gives a good impression.
Here you can see the size difference.
Details are hard to see due to the bare plastic.
Comparing this with the picture below makes it obvious that the
details on the superstructure and bridge are far superior.
While being a bigger scale model, the details are just simple,
geometrical shapes on the Revell model.
Also, the sensor globe/shield generator, while just
being a sphere on the Revell model, has little details
on it on the Bandai kit. 
One of the few parts where I have to give a point to Revell.
The reactor core/fuel cell (the semi-sphere)
is more detailed and looks more to scale on Revell's kit.
So all in all I'm really happy that I decided to switch models. I might not be able to do some of the damage I was planning initially but I'll have to fix that in the paint job. For now, I'm done building miniature Star Destroyers.

The finished result!
The model is about 11cm long
I hope you enjoyed reading this review and comparison article. Next step for me will be to prepare the model so that I can continue with the diorama.

TO THE BANDSANDER!!!

Hehe... See you all next time!

Tuesday, March 29, 2016

Bandai Star Wars 1/72 X- Wing Starfighter

Hi guys and girls,

I'm sorry my articles are not as frequent as they used to be. I just had a lot of stuff going on in my life (moving house and even worse, having to move my hobby stuff!!) that took a lot of my spare time that I would otherwise had used to write this.

The box art looks very cool! 

Acquiring this model kit can be tricky. Officially, Bandai can only sell this in Japan. So if you want to buy this you need to turn to Ebay, Amazon or a so called proxy buying service. The original price is 2.592 Yen (about $23) but this might get up to near $40 for some online retailers.

To me, Bandai was best known for their Gundam kits. These rather large, detailed robot kits usually have loads of moving parts like arms, legs, torso's and head. With this in mind I expected a lot from this kit. I was not disappointed!

Inside the box are four plastic bags containing sprue's, decal- and sticker sheets. First impressions are really good! The detail on the model looks crisp and to the naked eye looks just like in the movies!

As you can see they got multiple colors on one sprue.
White, red, transparent and transparent red.
This package also included the sticker sheet.

Hull parts, details and pilot parts.

Engine- and gunparts.

Wing parts.

The decal sheet

The base and stand of the model.
It comes with 2 parts.
One of them representing the 'thermal exhaust
port' leading to the Deathstar's reactor core.

The whole model is snap-fit so no glue is required. The tools Bandai recommends are clippers and a hobby knife, although I would add some small files and fine sanding paper to that list. No glue is required!

Do keep in mind though, this model is made for the Japanese market. This means that the instructions are also in Japanese. Luckily the pictures explain everything clearly, but you might want to double check some actions before cutting or forcing two parts together.

Clear steps to follow

The model is an absolute dream to put together! I had loads of fun and it was an 'easy' build for me. I ended up having some trouble painting the model though. I did wash the model (something I rarely have to do with plastics) but the paint and primer kept rubbing off. Also masking tape from Tamiya, generally known to be one of the best masking tapes out there, pulled the primer and paint right off! That is when I decided to use the decals instead... And they have decals for everything!!!

Stickers for the little side panels in the cockpit

The whole kit comes with tons of options! You can pose the X-Wing in a flying position or in a landed position. With the ton of extra bits (and some of your own) you would be able to make a diorama of it undergoing maintenance or something. It comes with one seated and one standing rebel pilot and with an R2 and R5 astromech droid.

Check out the cute little R5 droid!

If you want to paint this kit, I suggest painting some parts before assembling the model. For example, if you'd like for the astromech unit to be removable (yes you can switch the two out if you don't glue them in) you should paint them before placing them into the hull. (or you can use the decals they provided. TINY DECALS!!) Same goes for the pilot and the cockpit.

Painted rebel pilot.

Pilot placed inside the cockpit.

For the metallics (cockpit, engines, mechanical parts on the wings) I used AK-Interactive's X-TREME Metal paint. Earlier tests have proven that this paint is supposed to be very durable. Still, I was able to peal it clean off when using masking tape. It might have something to do with the type of plastic, so handle with care!

The rest of the model was primed with Vallejo airbrush black and light grey primer. This usually gives me great result but the paint stayed very fragile! I applied several coats and let them dry for 24 hours before applying the next layer. It might have something to do with the type of plastic.

I then continued to paint the hull with Vallejo offwhite. I applied thin coats and tried to make the center of the panels more opaque and the edges (near the panel lines) more transparent, showing some of the grey primer underneath.

The hull painted white.

After applying the white paint, I applied several thin layers of gloss varnish to protect the paint and prepare the model for the decals.

I loosely assembled the model .
At first my plan was to manually scratch up the decals to create realistic weathering but seeing how easy the paint came off during the painting process I chose for a different method. I sponged on white paint matching the original basecoat so the markings would appear to be worn and damaged.

After applying and weathering the decals I proceeded with the details on the rest of the model. I did a pin wash to bring out the panel lines and details using brown enamel wash by AMMO and I cleaned up using a cotton swap.

I used black pigment powder, engine grime, engine oil and fuel stains from AMMO to weather the engines.

I used a sponge with rust colored pigments to create streaks
After sealing all the progress so far I created the final chips, scratches and cracks by freehanding them all over the model. This was a lot of work but a lot of fun to do. You can also create some paint chips using your sponge by lighting dabbing your sponge against the surface you want to be weathered. This gives a more random effect but can also be messier. For the chips I used a dark brown paint by AMMO.

Freehanded chips on the wing and engine.
The final result is something I was quite proud of! I really enjoyed building and painting this model and I am more then sure this is not my last Bandai Star Wars kit. I still have the TIE Fighter, Y-Wing and maybe even the Millennium Falcon. The kits are super detailed and you can do all sorts of cool stuff with it like creating a crashed fighter or implement lighting effects with LED's and fiber glass.

The finished result
I really hope you liked this review and walkthrough of my experiences with this kit. If you liked it and would like to see more feel free to follow this blog using this link or to leave a comment down below.

What are your thoughts about the kit? Do you like it enough to try and get one or do you prefer a different brand?

As always thank you for reading and don't lick your brushes!