Showing posts with label how to. Show all posts

Monday, February 9, 2015

Step-by-step non metallic metal (NMM)

Hello again friends and followers!

I am so sorry it took me so long to write an other article. I usually take the pictures in advance and use bits and scraps of time to write an article around them. Lately everything has been so hectic I didn't even had those little bits of free time.

Luckily I found the time to type the article I had been planning for a while. I got the WFB Chaos Lord from Games Workshop because I wanted to experiment with the non metallic metal technique. (NMM)

If you want to try this for yourself here is a list of the colors I used:

  • VMC Black
  • GW Snakebite leather
  • VMC Golden yellow
  • VMC Ivory
  • GW Leviathan Purple

After applying the the colors for the armor (a mid-color green with some turquoise mixed into it) I started painting in the darkest colors of the gold. For this I used a 1:1 mix  of black and snakebite leather.

All metal parts are painted with several thin
layers of black/snakebite leather
Once you got the shadowcolor on its time to start thinking about the highlights. There are several ways to do this like using Object Source Lighting (OSL) or Sky-Earth NMM. I'm simply highlighting towards edges and obvious larger surfaces. The first highlight should be build up using thin layers of snakebite leather. Keep building it up until you got a solid color of snakebite leather, leaving the darker mix only in the deepest recesses.

First highlight of snakebite leather
With this first highlight in place you can already start to see which area's will be highlighted. now it is time to build up this highlight using a 1:1 mix of snakebite leather and golden yellow.
(no pictures of this step, sorry!)
Be sure to leave some of the snakebite leather visible and make absolutely sure you don't go over the black and snakebite leather mix!

Golden yellow layered on
Next step is golden yellow. This will make your gold look extremely yellow, as is shown on the picture above, but this will be rectified in last couple of steps. Again it is very important to leave some of the previous colors visible in order to get a smooth transition.

Next step will get you very close to the final result! I found that towards the end I used less paint on the model but spend more time painting it on. I used a mix of Ivory and Golden yellow (1:1) and applied it mainly on edges and other places that would specifically catch light or where I want to place an extra focus point.


This is the point where it looks less like layered yellow and more like NMM. The final highlight will be pure ivory and will only be painted in dots or on the edges of your edge hightlights.

Closeup on the shoulderpad
Another closeup on the shoulderpad


At this point I was really happy with my first time NMM result. To be honest it turned out a bit more yellow then I had imagined but it still looks good in my opinion. For the final step I painted the crevices with Leviathan Purple wash. Purple is a complementary color to yellow so it gave the gold a rich finish.

Final result!
So that's my first experience painting NMM. I hope you guys (and girls) enjoyed reading this and that if you are curious about painting NMM that it encouraged you to try it yourself! Good luck, happy painting and see you next time!

Monday, November 17, 2014

How to paint yellow (like for an Iyanden Eldar)

Hi guys (and possibly girls) and welcome to this new step-by-step tutorial. This time I will show you guys how I paint a nice, bright yellow that can be used for example on popular sci-fi tabletop armies like Imperial Fist Space Marines or Iyanden Eldar.

Yellow can be a hard color to paint using only a brush. A quick method to make this a lot easier is to prime your models white of a light grey instead of black. That will save you a lot of layers trying to get the color nice and bright. 

Using an airbrush makes painting bright colors like yellow a lot easier. Still I prefer painting over a light color to really make the yellow pop. 

I started with a light grey primer. I will start shading it first anyway so for me it doesn't really matter.

Eldar Guardian primed light grey
I used Vallejo light grey primer. It is important to let it dry for a couple of hours to really set on the model. It will be dry to the touch sooner and it will be possible to paint over it sooner, but you will still be able to scratch the primer of the surface. 


A quick coat of orange-brown
I mixed up some snakebite leather (old GW Citadel color) with a touch of golden yellow and sprayed it over the entire model. I focused on spraying it from below because this will be the shadow color. Next will be the highlight.

Top view after spraying white from the top
Using a zenithal highlight technique I spray white from 33ยบ angle from the top on the model. As you can see in the picture above looking down at it it will be almost white. 

Shadows and highlights
As you can see the brown still shows up where natural shadows would be visible. The rest of the mini is white which is an excellent base for the transparent yellow. Now cover the model with a thin layer of yellow. Make sure the paint is thin enough to let the shadows show through the yellow.

Model covered with yellow paint


You can see the light brown through the yellow
As you can see the yellow over the white gives you a really bright yellow color. When you look at the model at a downward angle you can still see the brown, creating a realistic shadow in the progress. 

Now this is only one of the many possible ways to paint yellow. I like this technique because its quick and easy and it looks good. 

Lets finish the model up real quick so you can get an idea of the finished result. I painted the gun, a kneepad and the head with a medium blue. You can further highlight these if you got the time but I didn't. I hope you liked this little tutorial and that it helps you paint better looking models or to help you paint your models faster.

Finished result

Thursday, October 16, 2014

Filling small gaps on miniatures

Hi everybody!
You know that feeling right, when you have this really cool new miniature but there are those seams and gaps in view that really don't make sense and make it look like a plastic toy rather then the high-end model it is supposed to be. 

Well in this article I will share the method I use to fill these little gaps on models.

To follow this tutorial you will need:

  • Model with gaps
  • Standard yellow-grey Milliput 
  • an old brush
For this tutorial I used a Chaos Lord from Warhammer Fantasy. A model I really love and which is in general a really good model. Most of the contact points are hidden behind armor or the cape. There are two gaps however, that are really visible on this model and they really bug me. I circled these with red. 

Ugly gaps on the WFB Chaos Lord
Time to fix this! I can imagine if you got this model for gaming purposes you don't really care about little details like this but I bought this model because I want to paint it up really nice so I want to make the model as good as I possibly can. 

I got out my Milliput, which is a two-part, cold setting, non shrinking epoxy putty, and mixed a little bit together. Once the two parts where mixed into a homogeneous ball I used the back of a brush to make a small dent in the ball, shaping it into a cup. 

Mixed Milliput cup
Next, dip your brush into clean water and transfer it to the Milliput cup. Using the brush mix the water with the Milliput to create a Milliput "wash". 

Milliput wash
Now, using a brush, apply this wash to the gap. It might take several passes. You can use a blow-dryer or blow on the gap to make the wash dry faster before adding an other layer of milliput wash.

Once you are satisfied let the whole thing dry for about 3 hours. The blow-dryer can speed up this process. When it is completely dry you can  use a fine sandpaper or sanding stick to smooth out the surface. 

Filled gaps
That's it for today! 
I really hope this article helps you make your models look nicer by filling those nasty gaps. Feel free to share your results with me or if you have any questions to post those in the comments.  

If you like this tutorial feel free to subscribe to this blog to see when I publish a new article or to share it with your friends via Google+, Facebook or Twitter.

See you next time! 

Tuesday, October 7, 2014

How to paint red miniatures

Hi there guys and girls!

I apologize for taking so long to write a new article. I have been very busy at work and real life, showing from the fact that I started writing this article like two and a half week ago.

I have also been repainting my X-Wing miniatures and trying to learn the game.This article will have nothing to do with that though.

Today I will share two methods I use to paint red.

A finished example of the final result

While a lot of people still prime their models black, I find it really hard to paint red over black. A simple reason for this is that red paint is usually very transparent so before you have a solid red color you are at least five or six layers in.

Now for the people that know me or have read some of the articles on this blog they might know that I am fond of using pre-shading and zenithal highlighting. For painting red I like to use a combination of these two techniques.

For the first example I want to create a bright red color. I primed a miniature in white primer. You could use any color you like but white is easier for me.

Miniature primed white
I like to work with light colored primers because it lets me see what I am actually doing. It's easier to see how thick your coat of paint is if you can actually see your miniature.
Once the primer is dry (a blow-dryer can certainly speed up this process) I proceed with the shadow color. Some people like to use black, and this is certainly the best choice for high contrast, but I used a medium brown and coated the whole miniature with this color.

A medium brown is used as a base color 
Using the brown as a shade for the darkest shadows I continued with a zenithal highlight with a medium to light grey color. Spray it from about 45 degree angle so the brown will stay in the deepest recesses and places where light would not hit the model.

Medium/light grey sprayed from a 45 degree angle
Next step is to spray white right on top of the miniature. Focus points should be the top of the shoulderpads, the face, the top of the backpack, hands, knees and toes.

White paint sprayed from above, creating the final highlight
Now comes the step where the magic truly happens. Using the transparency of most red paints we are gonna spray slightly thinned down red paint over the entire miniature. The idea behind this is that the brown stays mostly brown, the grey will make a dark red and the white will become a very vibrant red. The picture below is a bit fuzzy (sorry!) but you can see the gradient from bright red to slightly darker red on the shoulderpad and an even darker, red-ish brown on the elbow.

Final result
The downside of this technique is that you will need to apply a bunch of washes or paint the shadows in the crevices. A different technique I will share is where you build up the red from a dark brown up to red. This is my personal favorite technique because I really like the result.

I start with a primed model. I used grey primer because I wanted a darker basecolor then white or light grey but I still wanted to see what I was painting so I black was also not an option. The winner was this slightly dark grey.

Model sprayed with grey primer
Once the primer dried I coated the model with a layer of dark brown paint like scorched brown. This will be your shadow color but its important to get a contestant layer because you will be painting red over this and because red is a little transparent you might see any inconsistencies in this layer. 

After a solid layer of dark brown paint. 
Next up is building up layers of red paint. Make sure each layer covers less of the previous layer, building up a gradient. Focus extra on the shoulderpads, head, backpack, knees and feet.

Building up layers of red paint
Sadly I forgot to take a picture for the final layers of red. Just make sure that each layer covers a smaller surface of the previous layer. That way each layer will be progressively brighter red.

In the end you will end up with something similar to the picture below: a model with a nice gradient from brown to red.

Final result once all the details are painted.

I really hope this article gave you a little more insight in how I paint red miniatures. Of course there are many more methods that can be used but these are the two I prefer most. 

If you have any questions feel free to post them in the comments.

Wednesday, August 20, 2014

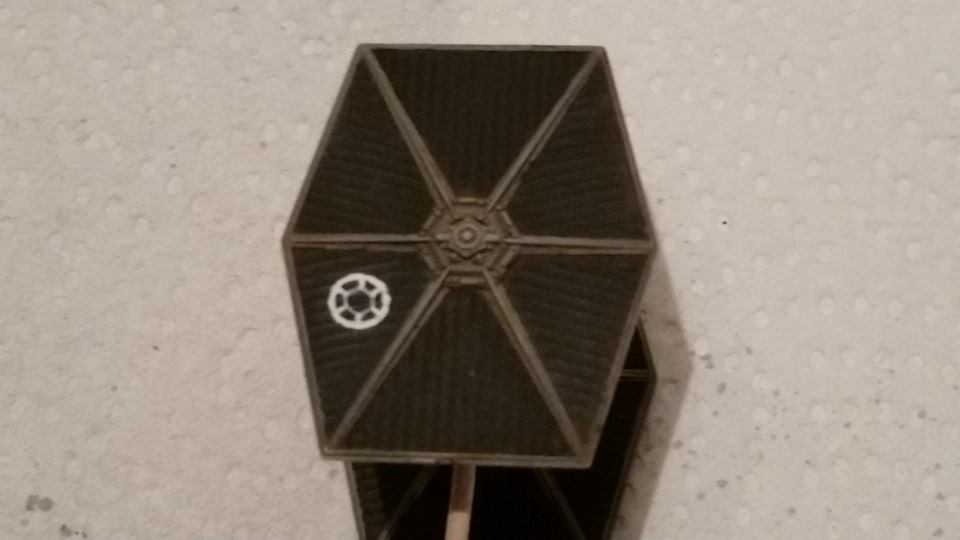
How to paint a miniature Star Wars Imperial logo and blood stripes on a TIE-Fighter

Hey guys and girls!
As promised I got a little tutorial on how I painted the small imperial logo on my TIE-Fighter. I found an example painted by a guy called Rodent Mastermind but no explanation how to paint it. I had to exeriment a couple of times to get it right.

 What I like about this is that it gives your X-Wing models a little extra character, like it could be a squadron leader or a decorated veteran. It's small enough to be a little forgiving on the details but it is detailed enough so it's recognizable from a tabletop distance.

You will need only one color of paint. This could be white, off-white or a very light grey. Whatever you like the most or what fits your paint scheme.

I began with the outer circle. This will mark the full location and size. I used the plastic rod to protect your brushes to "stamp" the location and used a brush to get a nice and even outer ring.

Outer ring stamped and corrected

When your satisfied with the outer ring, paint two small lines. One at the top and one at the bottom. Make sure these are pointing towards the top and bottom of your ship. After that, while trying to keep the Space between them as even as possible, add four more lines, bringing the total to six.

Divided the circle with small lines

Connect the lines inside the ring by painting a hexagon.

It's like connect the dots

At the corners of the hexagon, paint a square where the corner of the hexagon meets the line connecting it to the outer circle. I filled in the rest of the hexagon except for a small black dot in the middle.

Already starting to look like we are getting there! 

Now draw small black lines from the black dot. You can make these lines a bit triangular shaped if you like, but at this scale lines look good enough in my opinion.

Imperial logo is done! 

So on with the blood stripes. This is a visual introduced with the imperial aces. If I understood correctly imperial pilots are allowed to display these if they get ten kills. This means it is a nice way to decorate named pilots or veteran squadron leaders.

I started by masking the location of where I want to paint the stripes. Then, continuering with the weathered look, I choose to sponge on the paint.

Tamiya Masking tape applied

For this, I tore of a piece of blister sponge, dipped it into my red paint, rubbed off the excess paint on a paper towel and applied it to the miniature. The masking prevents the paint from hitting spots I don't want to to get on.

Blister sponge

I mixed up a semi-dark red for the blood stripe

Remove the masking tape and apply a thin layer of black wash.

Final, finished result

Your done now! You could touch some spots up with black, white or red but that's basically how you paint the logo and the blood stripes. Now if you weathered your ship a little (I did!) you can use some black and orangey - brown washes or pigments to give the logo and the stripe the same treatment.
I really hope you guys enjoyed this little tutorial! I sure did have a lot of fun experimenting and writing it!
Thank you for reading and see you next time.

Monday, June 16, 2014

Zenithal highlighting tutorial #1 Blue (Ultra Marine)

Hi everybody. Welcome back to my blog. This article will be one in a series of tutorials about zenithal highlighting. What I often do is I start a model with a zenithal highlight and I finish the rest up with brushes. In my opinion this is a good base to start from to get a general highlight onto the miniature before you start working on details. It is possible you have seen me use this in my painting a zombie step-by-step article.

In this first article I will cover how you can zenithal highlight blue miniatures. As always, we start by priming the miniature. Note, primer does not mean average black or white paint. Primer is a preparatory coating put on materials before painting. Priming ensures better adhesion of paint to the surface and increases the paint's durability. Because I think the shadows on the blue can be really dark so I chose for a black primer.

Miniature primed black

First layer of paint is a really dark blue. Over the black it is hardly noticeable but it will give your deepest shadows a blue look instead of just black.  The final result kind of surprised me in the fact that it looked even darker then the bare black primer.

Dark blue painted lightly over the black primer

When this layer of paint is dry I continue to a lighter color. It is kind of the same as brush painting, the more layers, the smoother the transition should look. For the next color, I chose the old Citadel Regal Blue. I sprayed this color from a 90 degree angle. This will leave only the darkest blue visible from places only seen when looked at the miniature from below.

Layer of Regal Blue

Next color is the old Citadel Ultramarine Blue. I sprayed this from a 45 degree angle onto the model. This will leave some of the regal blue visible. Be sure to adequately dilute your paint to get your transition as smooth as possible. Short, controlled bursts are the way to go here.

Ultramarine blue

Here you can see some progress! The Ultramarine blue is covering a large surface on the miniature. You can see some shadows apearing on the lower leg, lower body and his right arm. (left on the picture)
For the next highlight I mixed Citadel Ice Blue into the Ultramarine Blue on a  1:2 ratio. I sprayed it directly from the top of the miniature mimicing light coming from directly above.

Highlight with a mix of Ultramarine and Ice Blue

At this point you have a pretty solid gradient going from dark blue shadows to the light blue highlight. I wasn't completely happy with it and wanted to push the highlight a bit further. In order to do this, I felt I had to saturate the blue and I did this by praying a blue wash / glaze made out of thinned down Minitaire Ghost Tint Blue.

After a blue glaze

It is kind of hard to see in the picture but with the blue glaze over the miniature I retained the gradient while darkening the blue. This gave me the room I felt I needed to give the model that one extra highlight, making it apear that the armor is reflecting lighting coming from above. I used pure Citadel Ice blue and watered it down using three parts water and one part paint. Using small, controlled sprays I focused on the head, shoulderpads, knees, feet and the backpack.

Final highlights using pure Ice blue

So this is the end of the first tutorial about zenithal highlighting. So far I recieved requests for bare metal/silver and red. I will do my best to cover these in one of the following articles about zenithal highlighting. If you liked this article or think one of your friends can benefit from this tutorial feel free to share it.

Thank you for reading and I hope to see you next time.

Wednesday, June 4, 2014

How to paint a magical or futuristic power weapon

Hello dear friends, followers and newcomers.

Today I will share a technique I use to paint powered weapons for futuristic models and magical weapons for fantasy themed models. In a certain way, this is a very basic NMM (None Metallic Metal) technique. I used an airbrush for this technique, but if you are adept at glazing or layering, you should be able to get a similar effect.

For this tutorial I used a sword, but you can also use an axe, pole arm or other (bladed) weapon.


First, let's prime the miniature. For this I used a very light grey primer because I did not have a white primer handy. Either one would work perfectly for this technique. The reason I chose a light color, is because I want the colors to be really vibrant.


Let's start with the mid tone. For this sword, I am going for a magical blue effect. For that reason I paint the whole middle section of the blade with spellslinger blue. This is a special airbrush paint. You could basically use any mid-color you want to use. by mid-color I mean any middle blue, green, red, purple and I am sure there is a better term for it.


Try to only cover about one third of the blade (the middle part) for optimal effect. Once this is done and the paint has dried, get a piece of masking tape and mask the sword straight down the middle. For other weapons find a beveled edge and mask one of the sides.


Continue by painting one side with a dark color like dark blue or black and the other side a light blue or white. If you want to use an airbrush, glazing techniques or layering is entirely up to you. Once you are done painting, remove the masking tape to prevent bleeding paint on the other side. Wait for the paint to dry and then mask your pained side and paint the other side in the opposite direction. Again, as soon as your done painting remove the masking tape.


As you can see I achieved a nice blend using my airbrush. Next is to define the edges and the magical runes with white paint. As you can see I struggle with the line down the middle so if anyone has any tips please put those in the comments. We learn from each others experiences right? If you have runes like these you can simply paint them white, if they are engraved into the weapon, it might be easier to make a wash and paint that into the runes. A wash is easier to clean up then straight paint.

There! That is the blade all done! Depending on what technique you use this can be either a relatively fast technique or one with slow process but a very rewarding result. Just make sure you got your paints thin and your blending as smooth as you can. You can proceed by using OSL (Object Source Lighting) techniques to simulate a glow from the sword on the miniature, but I will save that for an other time.


I hope you enjoyed reading this article. If you did and think your friends can benefit from it, feel free to link it in forums or share it on your page.

If you have requests for future articles, don't hesitate to post a comment or message me on facebook.

I hope to see you next time.