Showing posts with label tutorial. Show all posts

Wednesday, July 18, 2018

How to paint battered bronze

Hello friends and fellow hobbyists,

Before I continue with this article I would like to express my feelings:
I CAN'T STAND THIS HEAT!!!
Okay now that I got that off my chest, we can continue... Thank you for understanding.

Some of you have seen my painted version of Achilles by Young Miniatures and I've gotten a ton of compliments about how I painted the bronze armor. I did take some pictures of the painting process but not really step by step.


Luckily, I also had a bust of Hector, by the same company, and in order to tie them together, I wanted to paint some elements the same way. The center relief on the shield was the perfect spot for this.

Materials I used for this paint job:
  • Scale75 matte black paint (depending if you want to start with a dark base) 
  • Scale75 Ancient Gold
  • Synthetic brush (size 2) 
  • Van Gogh oil color Ivory Black
  • Thinner
  • Blister sponge
Now you can start this particular technique in two ways, depending on if you want a darker or lighter end result. I wanted to match the dark armor on my Achilles bust, so I started with a black basecoat. If you want to create a lighter bronze look, you can best start with a dark gold or bronze base.

(PS: I apologize for the horse nudity, but that is how it was on the original movie prop)

Okay, but since I wanted to match with Achilles' armor, I started with a black basecoat, just regular matte black acrylic paint from Scale75.


Since we will also be working with oil paint, and thus will also be using some thinner, you might want to protect your paint job with a coat of varnish. I did it without varnishing my paint job since I've done it before with these paints and didn't have any problems.

So If you started with a gold basecoat, you can skip this following step once! It is time to stipple on some gold. For this, I use an irregularly ripped blister sponge to sponge on some of the Scale75 Ancient Gold. Try to make it look as random as possible by using different angles and twisting and turning your sponge.


As you can tell from the above picture, it does create a nice texture, but it looks way too bright! What I like about this technique is that you will hit raised surfaces and larger flat area's, but the crevices next to the detail won't get touched by the gold so much. Next step is to tone down that bright gold. people who started with a gold base and thus skipped this previous step can chime back in now!


Now get some of the black oil paint and put it on a piece of cardboard. This will suck out some of the oils, which makes it easier to work with. Next, get some of that black paint and put it over the previous (partially) gold layer. Don't freak out if it covers your gold completely! Just get some thinner on your brush and work the black paint around on the model until some of the detail from the previous layer starts to show through.

From this point onward, just repeat the previous two steps for a while until you're happy about how it looks. From this point, I did two or three more layers, each layer creating more depth because you keep seeing some of the gold from the underlying layers and you're creating an actual texture to the surface that you're painting.


Okay, so at this point, I'm pretty satisfied with how the embossed relief looks. It might be a little darker than the one from the movies, but it ties in really nice with the armor of Achilles. To give it a little individuality I decided to paint on some verdigris. This is the greenish oxidation or rust that you sometimes see on bronze statues. To make this, I mixed some green and turquoise together and applied it randomly in the crevices where I thought it looked nice.


There you have it! You can, of course, use this technique for different kinds of metallics, but I especially like it for this aged and worn bronze.

I hope you found this little tutorial useful and if you did or want to see more tutorials like this be sure to leave me a little comment down in the comment section.

Untill next time!

Monday, November 28, 2016

How to turn a picture frame into a display plinth

Hello and welcome if you are new and welcome back if you are a regular reader! 😊

Today I will show you how to create a very simple and very cheap display plinth for scale model tanks (Example 1), airplanes ships or dioramas. You could even turn it into a squad display (Example 2) if you are into wargamers.

The very long list of requirements for this is:
A dollar store beveled picture frame.
That's it.

10*15cm beveled picture frame 
For this specific display, I picked a 10cm x 15cm frame, but you can pick whatever fits your project.
So first remove the back of the frame and the glass that is supposed to cover your picture.

removing the back of the frame
Get rid of the stand and any other bits they might have added to hang it on your wall or anything.
Place the back of the picture frame in front of the frame like shown in the picture.

I used a sturdy sculpting tool to remove the metal bits
Now place your model(s) on it and start planning how to build your base. Thus could be an ocean, beach, landings trip, a simple road or a more elaborate scene. Whatever you want. If you want, you can paint the whole thing in a uniform color to get a better idea of how it will eventually look. 

Final result!

Example 1

Example 2
I hope you found this article helpful! What do you use for plinths? Please share any tips or questions you might have in the comments!

Good luck and happy painting!

Monday, December 14, 2015

Quickly paint engraved glyphs / OSL

Hello everybody!

Ever got a model that has those engraved glyphs that you would like to stand out more but all you have are dark washes? Ever tried to paint those glyphs and ended up in an eternal circle of going back and forth cleaning up mistakes?


Well that is what I had. I was painting 40 Necron warriors with converted weapons (engraved gun barrels instead of the green clear plastic ones) that I wanted to paint like the engraved detail was glowing. The easiest way to for me to do this would be to paint the glyphs white and airbrush some green glow over it.

Painting the white was a hassle and took way to much time to get it neatly done, so I set out to find a better way.

I found this by using the pin wash / panel wash technique, mostly used in historical scale modelling to darken the gaps between panels but this time, with a twist.

When you look online for panel lining you will find a bunch of video's and articles about black or brown oil washes. I used the mechanic behind this technique but I changed it by using white oil paint.

So what you need for this is:

  • White oil paint (titanium white)
  • (odorless) Thinner
  • (preferably) synthetic brush
What you want to do is first protect your paintjob with a layer of gloss or satin varnish! 
Next you will want to take a bit of the white paint and thin it down with the thinner. The thinner can really mess with your organic brushes. (they will ruin your red saber brushes)
Once the mix has a wash consistency it is time to take it to the model. 

Next step is SUPER easy! (as seen in the short video below)


After this step you can clean your brush in some thinner and dab the brush on a paper towel or cloth to get rid of the excess thinner and then use the damp brush to clean up around the edges.

Once the white wash is dry all that is left to do to create a simple OSL (object source lighting) is to airbrush some green over the gun barrel.

An other example of this technique is on the glyphs on the forceshield of an Eldar Wraithblade. 


As you can see it is super quick and easy. If you would like to make them glow you could airbrush some light blue (or any other color) over them to create a mystical effect.

Another application of this technique would be on for example, powerfists and plasma coils. Here it would be logical for the crevices to be the lightest. So you airbrush or paint your fist or plasma weapon in the desired color, use a white oil wash, and then glaze in some color. to make it blend in. 

I hope this article helped you to speed up or improve your painting. 

If it did please share your results!

Thank you for reading and leave no model unpainted!

Wednesday, March 25, 2015

Product review: Vallejo Grey Pumice paste

Hi guys and girls,

Sorry for the lack of content lately but I have a valid excuse:

Small fracture in my left radius
Luckily for me no cast was required but it hurts and I am required to carry my arm in a sling. I am slowly getting my mobility back so typing is less hurtful and I can rest my arm on a desk now.

Okay, on with the subject of this article.

Vallejo basing pastes. Not a lot of people use these but I found that they are a great addition to a modelers arsenal. I have two variants, the Dark Earth #26.218 and the Grey Pumice #26.213. If you buy a pot you will get a 200ml. pot filled with a sandy or stony paste consisting pigments, resin and a texture like sand or an other material.

200ml. pot of basing paste
Depending on what you use it for this pot can last you a good while! I can imagine that if you are using this to base an army of gaming models that one pot will last you through the entire army.

Beneath the lid
Applying it can be done with either an old brush or a painting knife/sculpting tool. What I really like about this product is that you can really sculpt texture onto your base. Be sure to keep your good brushes away from this stuff as it will ruin them beyond repair! I personally use some very cheap, slightly bigger brushes with very stiff bristles. They are also sometimes used to apply woodglue to surfaces. They can scoop up a good amount of paste and its pretty easy using it to apply it to a base. You can really build up and sculpt your texture to a base.

A brush full of basing paste.
Be sure to cover the entire area you want to be covered with this texture. There is a little bit of shrinkage so you will have to keep that in mind. You can build it up quite thick but that will have a direct result in longer drying times, which are between 45 minutes to even days.

Dried basing paste
This is the result after about 10 hours of drying time. It is dry to touch and you can continue by painting it. While it will remain a little soft for a day or two it is dry enough to hold paint, receive a drybrush and being exposed to washes and pigments.

I really hope you guys liked this article and that it helps you improve your bases. If you have any questions or remarks please leave them in the comments!

Happy modeling and painting my friends!


Monday, February 9, 2015

Step-by-step non metallic metal (NMM)

Hello again friends and followers!

I am so sorry it took me so long to write an other article. I usually take the pictures in advance and use bits and scraps of time to write an article around them. Lately everything has been so hectic I didn't even had those little bits of free time.

Luckily I found the time to type the article I had been planning for a while. I got the WFB Chaos Lord from Games Workshop because I wanted to experiment with the non metallic metal technique. (NMM)

If you want to try this for yourself here is a list of the colors I used:

  • VMC Black
  • GW Snakebite leather
  • VMC Golden yellow
  • VMC Ivory
  • GW Leviathan Purple

After applying the the colors for the armor (a mid-color green with some turquoise mixed into it) I started painting in the darkest colors of the gold. For this I used a 1:1 mix  of black and snakebite leather.

All metal parts are painted with several thin
layers of black/snakebite leather
Once you got the shadowcolor on its time to start thinking about the highlights. There are several ways to do this like using Object Source Lighting (OSL) or Sky-Earth NMM. I'm simply highlighting towards edges and obvious larger surfaces. The first highlight should be build up using thin layers of snakebite leather. Keep building it up until you got a solid color of snakebite leather, leaving the darker mix only in the deepest recesses.

First highlight of snakebite leather
With this first highlight in place you can already start to see which area's will be highlighted. now it is time to build up this highlight using a 1:1 mix of snakebite leather and golden yellow.
(no pictures of this step, sorry!)
Be sure to leave some of the snakebite leather visible and make absolutely sure you don't go over the black and snakebite leather mix!

Golden yellow layered on
Next step is golden yellow. This will make your gold look extremely yellow, as is shown on the picture above, but this will be rectified in last couple of steps. Again it is very important to leave some of the previous colors visible in order to get a smooth transition.

Next step will get you very close to the final result! I found that towards the end I used less paint on the model but spend more time painting it on. I used a mix of Ivory and Golden yellow (1:1) and applied it mainly on edges and other places that would specifically catch light or where I want to place an extra focus point.


This is the point where it looks less like layered yellow and more like NMM. The final highlight will be pure ivory and will only be painted in dots or on the edges of your edge hightlights.

Closeup on the shoulderpad
Another closeup on the shoulderpad


At this point I was really happy with my first time NMM result. To be honest it turned out a bit more yellow then I had imagined but it still looks good in my opinion. For the final step I painted the crevices with Leviathan Purple wash. Purple is a complementary color to yellow so it gave the gold a rich finish.

Final result!
So that's my first experience painting NMM. I hope you guys (and girls) enjoyed reading this and that if you are curious about painting NMM that it encouraged you to try it yourself! Good luck, happy painting and see you next time!

Monday, November 17, 2014

How to paint yellow (like for an Iyanden Eldar)

Hi guys (and possibly girls) and welcome to this new step-by-step tutorial. This time I will show you guys how I paint a nice, bright yellow that can be used for example on popular sci-fi tabletop armies like Imperial Fist Space Marines or Iyanden Eldar.

Yellow can be a hard color to paint using only a brush. A quick method to make this a lot easier is to prime your models white of a light grey instead of black. That will save you a lot of layers trying to get the color nice and bright. 

Using an airbrush makes painting bright colors like yellow a lot easier. Still I prefer painting over a light color to really make the yellow pop. 

I started with a light grey primer. I will start shading it first anyway so for me it doesn't really matter.

Eldar Guardian primed light grey
I used Vallejo light grey primer. It is important to let it dry for a couple of hours to really set on the model. It will be dry to the touch sooner and it will be possible to paint over it sooner, but you will still be able to scratch the primer of the surface. 


A quick coat of orange-brown
I mixed up some snakebite leather (old GW Citadel color) with a touch of golden yellow and sprayed it over the entire model. I focused on spraying it from below because this will be the shadow color. Next will be the highlight.

Top view after spraying white from the top
Using a zenithal highlight technique I spray white from 33º angle from the top on the model. As you can see in the picture above looking down at it it will be almost white. 

Shadows and highlights
As you can see the brown still shows up where natural shadows would be visible. The rest of the mini is white which is an excellent base for the transparent yellow. Now cover the model with a thin layer of yellow. Make sure the paint is thin enough to let the shadows show through the yellow.

Model covered with yellow paint


You can see the light brown through the yellow
As you can see the yellow over the white gives you a really bright yellow color. When you look at the model at a downward angle you can still see the brown, creating a realistic shadow in the progress. 

Now this is only one of the many possible ways to paint yellow. I like this technique because its quick and easy and it looks good. 

Lets finish the model up real quick so you can get an idea of the finished result. I painted the gun, a kneepad and the head with a medium blue. You can further highlight these if you got the time but I didn't. I hope you liked this little tutorial and that it helps you paint better looking models or to help you paint your models faster.

Finished result

Thursday, October 16, 2014

Filling small gaps on miniatures

Hi everybody!
You know that feeling right, when you have this really cool new miniature but there are those seams and gaps in view that really don't make sense and make it look like a plastic toy rather then the high-end model it is supposed to be. 

Well in this article I will share the method I use to fill these little gaps on models.

To follow this tutorial you will need:

  • Model with gaps
  • Standard yellow-grey Milliput 
  • an old brush
For this tutorial I used a Chaos Lord from Warhammer Fantasy. A model I really love and which is in general a really good model. Most of the contact points are hidden behind armor or the cape. There are two gaps however, that are really visible on this model and they really bug me. I circled these with red. 

Ugly gaps on the WFB Chaos Lord
Time to fix this! I can imagine if you got this model for gaming purposes you don't really care about little details like this but I bought this model because I want to paint it up really nice so I want to make the model as good as I possibly can. 

I got out my Milliput, which is a two-part, cold setting, non shrinking epoxy putty, and mixed a little bit together. Once the two parts where mixed into a homogeneous ball I used the back of a brush to make a small dent in the ball, shaping it into a cup. 

Mixed Milliput cup
Next, dip your brush into clean water and transfer it to the Milliput cup. Using the brush mix the water with the Milliput to create a Milliput "wash". 

Milliput wash
Now, using a brush, apply this wash to the gap. It might take several passes. You can use a blow-dryer or blow on the gap to make the wash dry faster before adding an other layer of milliput wash.

Once you are satisfied let the whole thing dry for about 3 hours. The blow-dryer can speed up this process. When it is completely dry you can  use a fine sandpaper or sanding stick to smooth out the surface. 

Filled gaps
That's it for today! 
I really hope this article helps you make your models look nicer by filling those nasty gaps. Feel free to share your results with me or if you have any questions to post those in the comments.  

If you like this tutorial feel free to subscribe to this blog to see when I publish a new article or to share it with your friends via Google+, Facebook or Twitter.

See you next time! 

Tuesday, October 7, 2014

How to paint red miniatures

Hi there guys and girls!

I apologize for taking so long to write a new article. I have been very busy at work and real life, showing from the fact that I started writing this article like two and a half week ago.

I have also been repainting my X-Wing miniatures and trying to learn the game.This article will have nothing to do with that though.

Today I will share two methods I use to paint red.

A finished example of the final result

While a lot of people still prime their models black, I find it really hard to paint red over black. A simple reason for this is that red paint is usually very transparent so before you have a solid red color you are at least five or six layers in.

Now for the people that know me or have read some of the articles on this blog they might know that I am fond of using pre-shading and zenithal highlighting. For painting red I like to use a combination of these two techniques.

For the first example I want to create a bright red color. I primed a miniature in white primer. You could use any color you like but white is easier for me.

Miniature primed white
I like to work with light colored primers because it lets me see what I am actually doing. It's easier to see how thick your coat of paint is if you can actually see your miniature.
Once the primer is dry (a blow-dryer can certainly speed up this process) I proceed with the shadow color. Some people like to use black, and this is certainly the best choice for high contrast, but I used a medium brown and coated the whole miniature with this color.

A medium brown is used as a base color 
Using the brown as a shade for the darkest shadows I continued with a zenithal highlight with a medium to light grey color. Spray it from about 45 degree angle so the brown will stay in the deepest recesses and places where light would not hit the model.

Medium/light grey sprayed from a 45 degree angle
Next step is to spray white right on top of the miniature. Focus points should be the top of the shoulderpads, the face, the top of the backpack, hands, knees and toes.

White paint sprayed from above, creating the final highlight
Now comes the step where the magic truly happens. Using the transparency of most red paints we are gonna spray slightly thinned down red paint over the entire miniature. The idea behind this is that the brown stays mostly brown, the grey will make a dark red and the white will become a very vibrant red. The picture below is a bit fuzzy (sorry!) but you can see the gradient from bright red to slightly darker red on the shoulderpad and an even darker, red-ish brown on the elbow.

Final result
The downside of this technique is that you will need to apply a bunch of washes or paint the shadows in the crevices. A different technique I will share is where you build up the red from a dark brown up to red. This is my personal favorite technique because I really like the result.

I start with a primed model. I used grey primer because I wanted a darker basecolor then white or light grey but I still wanted to see what I was painting so I black was also not an option. The winner was this slightly dark grey.

Model sprayed with grey primer
Once the primer dried I coated the model with a layer of dark brown paint like scorched brown. This will be your shadow color but its important to get a contestant layer because you will be painting red over this and because red is a little transparent you might see any inconsistencies in this layer. 

After a solid layer of dark brown paint. 
Next up is building up layers of red paint. Make sure each layer covers less of the previous layer, building up a gradient. Focus extra on the shoulderpads, head, backpack, knees and feet.

Building up layers of red paint
Sadly I forgot to take a picture for the final layers of red. Just make sure that each layer covers a smaller surface of the previous layer. That way each layer will be progressively brighter red.

In the end you will end up with something similar to the picture below: a model with a nice gradient from brown to red.

Final result once all the details are painted.

I really hope this article gave you a little more insight in how I paint red miniatures. Of course there are many more methods that can be used but these are the two I prefer most. 

If you have any questions feel free to post them in the comments.

Wednesday, August 20, 2014

How to paint a miniature Star Wars Imperial logo and blood stripes on a TIE-Fighter

Hey guys and girls!
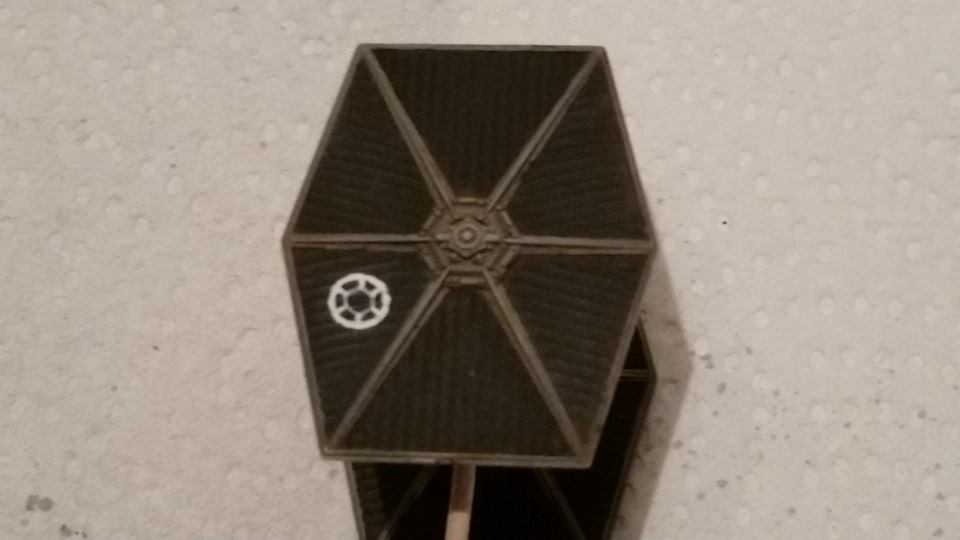
As promised I got a little tutorial on how I painted the small imperial logo on my TIE-Fighter. I found an example painted by a guy called Rodent Mastermind but no explanation how to paint it. I had to exeriment a couple of times to get it right.

 What I like about this is that it gives your X-Wing models a little extra character, like it could be a squadron leader or a decorated veteran. It's small enough to be a little forgiving on the details but it is detailed enough so it's recognizable from a tabletop distance.

You will need only one color of paint. This could be white, off-white or a very light grey. Whatever you like the most or what fits your paint scheme.

I began with the outer circle. This will mark the full location and size. I used the plastic rod to protect your brushes to "stamp" the location and used a brush to get a nice and even outer ring.

Outer ring stamped and corrected

When your satisfied with the outer ring, paint two small lines. One at the top and one at the bottom. Make sure these are pointing towards the top and bottom of your ship. After that, while trying to keep the Space between them as even as possible, add four more lines, bringing the total to six.

Divided the circle with small lines

Connect the lines inside the ring by painting a hexagon.

It's like connect the dots

At the corners of the hexagon, paint a square where the corner of the hexagon meets the line connecting it to the outer circle. I filled in the rest of the hexagon except for a small black dot in the middle.

Already starting to look like we are getting there! 

Now draw small black lines from the black dot. You can make these lines a bit triangular shaped if you like, but at this scale lines look good enough in my opinion.

Imperial logo is done! 

So on with the blood stripes. This is a visual introduced with the imperial aces. If I understood correctly imperial pilots are allowed to display these if they get ten kills. This means it is a nice way to decorate named pilots or veteran squadron leaders.

I started by masking the location of where I want to paint the stripes. Then, continuering with the weathered look, I choose to sponge on the paint.

Tamiya Masking tape applied

For this, I tore of a piece of blister sponge, dipped it into my red paint, rubbed off the excess paint on a paper towel and applied it to the miniature. The masking prevents the paint from hitting spots I don't want to to get on.

Blister sponge

I mixed up a semi-dark red for the blood stripe

Remove the masking tape and apply a thin layer of black wash.

Final, finished result

Your done now! You could touch some spots up with black, white or red but that's basically how you paint the logo and the blood stripes. Now if you weathered your ship a little (I did!) you can use some black and orangey - brown washes or pigments to give the logo and the stripe the same treatment.
I really hope you guys enjoyed this little tutorial! I sure did have a lot of fun experimenting and writing it!
Thank you for reading and see you next time.